One of the preferred tactics of many stillwater experts is the use of a slow almost painful retrieve especially when using chironomid patterns. This technique is often done “Naked”, which is without and indicator. In order to fool the largest and most challenging fish you must sometimes retrieve the fly at a maddening creeping pace. This pace is often referred to as static. Sort of like watching paint dry.
When targeting greater depths, 10′ to 20′ many of these anglers have used indicators. The technique evolved using corkie indicators set to depth and fixed in place with a toothpick to enable the angler to present flies right on the bottom where they need to be. In the past toothpicks have been the most popular method of pegging the indicator to the appropriate depth. The only problem was that when a fish was hooked, the anglers risked loosing the fish by having to grab the line during the battle, using their teeth to remove the toothpick. The indicator slid free for the balance of the fight. With the newer evolution of “Slip” or “Quick Release” indicators, the battle of removing the toothpick is now over.
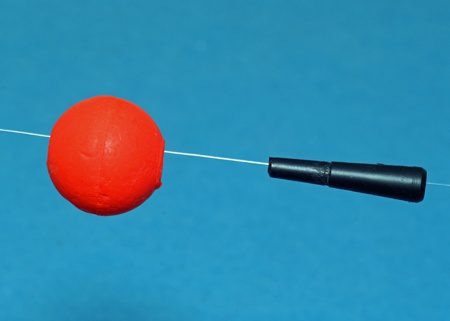
What has come to be the technique of choice for fishing water over 10 feet and up to 20 feet is the use of “Slip” or “Quick Release” Indicators. The Slip Indicator uses a concept so simple it makes you wonder “What took so long”. The system uses an over sized peg that the leader is fed through and then pegged to the “Corkie” style indicator. The Slip Indicator system allows a fly fisher to fish deeper waters with confidence.
In actual practice, to rigg the indicator you thread the indicator and peg onto your leader, gather and pinch the leader and then push the leader against itself to create a loop of approximately 1″ in diameter, just slightly shorter than the peg sticking out of the indicator. The peg wants to be pointed to the fly not the fly line. Push the peg with firmly but not too tight into the indicator.
When the strike comes, lift the rod and the tension between the angler and fish releases the loop and the indicator is free to slide. The cumbersome method of removing a tooth pick is gone.
Slip Indicator Tips
- When fishing with slip indicators the technique is almost static. It is primarily “Heave it and Leave It”.
- If the choice is to move the indicator at all, use a pinch strip, holding your hands together and moving the indicator an inch at a time, very slowly.
- You can use use a 6″ to 12″ strip with a steady and very slow motion.
- OK, how slow is slow? When fishing indicators, imagine you are sitting on a keg of dynamite. When retrieving, if you see any ripple of water moving at the indicator or from the floating line, you blow yourself up. That slow!
- When fishing leeches under indicator, try casting straight up wind and hand twist retrieve it as the wind pushes it back towards you. You are really just gathering line not trying to move the flies.
- Use wind drifting to fish the indicator rigg.
(a) Anchor with fore and aft anchors parallel to the wind.
(b) Cast across wind at a 90 degree angle to your anchored position
(c) Let the wind move your indicator along with the wind
- Remember insects can’t swim against the wind they drift with the current.
- Start with your flies 1′ to 2′ off the bottom. Then work up the water column until you find willing fish. 6″ can make a difference especially with rainbow trout.
- Focus on water that is less than 20′ deep
How do you Determine Depth
How do you determine the depth of the water you’re fishing in. You can get a rough idea from using your electronics, fish finder with a depth sounder, to get a ball park. But to get it right, you need to test the depth. Anchor your boat fore and aft and test the depth where you plan to fish.
(a) Set your indicator to the approximate depth as determined by your depth finder
(b) Attach weight to your point fly (bottom fly).
(c) You can attach your hemostats to the fly or a weighted sinker
(d) Lower the fly with the weight slowly until it gently hits the bottom.
(e) Check to see how far the indicator is under the surface of the water.
(f) This will be the depth of your point fly off the bottom when you remove the hemostats or weight.
(g) Adjust the indicator accordingly to the desired depth to be fished. You want to start at 1′ to 2′ off the bottom or the weeds.
Use “Balanced Flies”
 Try using balanced flies. Tie up some balanced flies, like a “Balanced Leech”. This style of tying incorporates a tungsten bead mounted on a common straight pin that extends from the hook shank in front of the eye. The tungsten beads work best as their dense mass maintains an overall compact fly.
The horizontal balanced flies take on the natural path and profile of most aquatic food sources. Their pitching and jigging action is tough for fish to resist. Try tying up a balanced leech or scud and see how they work.
You can get tying instructions for “Balanced Leeches” at Phil Rowley’s – www.flycraftangling.com. His site is full of stillwater fishing tips and techniques. Check it out!
The “Balanced Leech” photo is courtesy of Fly Craft Angling.
How do you Rigg your Leader for Slip Indicators
- Start with tying a stiff piece of 24″ monofilament to the fly line with a nail knot.
- Tie on a tapered leader, 9′ to 15′, 3x or 4x with a blood knot. If the budget allows fluorocarbon leaders are ideal. Especially when targeting water about 10′ deep.
- With the butt section and leader in place simply add fluorocarbon tippet to reach the overall finished leader length.
- Add a swivel or tippet ring at the end of your extended tippet to insure you won’t lose the peg from your indicator in the case of a break off.
- Install the swivel 18″ to 24″ above the 1st fly.
- You can tie a dropper right off the swivel or tippet ring.
How do you determine the length of the tippet?
A simple rule of thumb to follow is the overall leader length should be 25% longer than the water is deep. For example, working a chironomid pupa in 15 feet of water would require a 19-foot leader.
How to you Rigg the actual Slip Indicator
- Slip indicators come in various sizes, colors and shapes. Carry many options.
- The common denominator is that they all have a peg to fix the indicator in place.
- This peg comes loose when a fish takes your fly and tightens the line. The peg and the indicator drops to a swivel or tippet ring placed above your flies.
- Carry swivels and/or tippet rings to keep from losing your indicator and mainly the peg. The indicator would float to the surface if you broke off, the peg won’t
- When installing the indicator the peg faces the flies.
- You can tie a dropper off the swivel or the tippet ring as an option.
- Use a dropper tags to attach the droppers. Keep them shorter than 10″.
- Maintain a spacing of about 3 feet between your flies.
Casting Indicators
- Keep casts short, 30′ to 35′ is ideal
- Use a roll cast combined with roll cast pickup to recast your rigg.
- Use small indicators to keep yourself honest and keep the indicators close enough (30′ to 35″.
- When casting, open up your loops, break your wrist slightly. Apply smooth power. Don’t punch your casts.
- Make sure your backcasts lay out behind your completely.
- Try integrating a “Belgian Cast”.
- Shoot your line to the target.
- Watch for distinct plops of your indicator and the flies laying out to make sure you’re not tangled.
Summary
Add “Slip” or “Quick Release” Indicators to your stillwater strategies and you will take your stillwater game to a new level.
You can purchase Phil Rowley’s Slip Indicators at his website – www.flycraftangling.com